Saturday, July 27, 2013

Road Trip to Shipshewana

Earlier this week, a friend asked if I would like to take a road trip to Shipshewana.  I've written about this little town up in northern Indiana before.  This is where we go twice a year for our Dear Jane retreat.  The town was beautiful, and there were pretty flowers everywhere.


These little flower carts seemed to be all over town.  This is the one in front of the Blue Gate Restaurant.


The Farmstead was beautiful as usual.


There was good food.  We also went to Rise 'N Roll Bakery, but I was too busy eating my donut to take a photo.


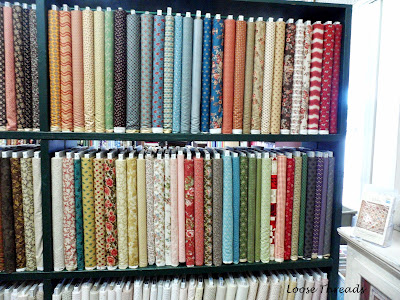
And, of course there was fabric.  Here is a view into Yoder's fabric section.


We saw beautiful quilts.  I just love this twisted bargello.  It reminds me that I have a twisted bargello wall hanging in similar colors that needs to be quilted.


This is a nice combination of Civil War fabrics.  I have a few of the fabrics from this quilt in my stash.   I really like the borders on this quilt.


There is even log cabin cheater cloth and a lot of nice solid fabrics for those of you that want to just add a border and quilt.  I'm thinking that this would make a great backing, too.


Those of you that have been to Lollys know that there is always lots of gorgeous fabric there.  This is the usual display of Kaffe Fassett fabric.  The shot cottons are in that case you see to the left of the photo.  On the back of this display is the Kaffe stripes.


But now there is a Kaffe and Brandon wall.  Just look at the color!!!!


There is Civil War fabric as usual.  There is a nice selection upstairs as well as downstairs in A Little Bit of Lollys.  I did do a little "fishing" in the boat.  I was too busy and didn't remember to get a photo.


This is only a part of the Civil War fabrics.


I searched for quite awhile for some of these fabrics and could have found them right here.


Thanks for stopping by for a visit!

And always remember.....


Sunday, July 21, 2013

Pulled Pork and Hexagons

While my daughter was visiting friends, they fixed pulled pork.  I have never been able to make pork that has tasted this good, so I thought I'd share the recipe with you.

The sauce recipe came from this web site:
http://m.allrecipes.com/recipe/16115/bourbon-whiskey-bbq-sauce
We prepared the sauce the day before we roasted the pork.  I retyped the recipe under my Recipes tab (above).


We roasted a 5# pork shoulder roast in my big turkey roaster at 225 degrees for 10 hours.  Here is all we did:  Spray the bottom of the roaster with Pam cooking spray and place the roast in with the fat cap facing up.  NO water.  I was surprised that it didn't stick.  Cover the pan with foil, put the lid on and roast.  We put the roast in overnight since we have had such high daytime temperatures the last week. After the roast cools for about a half hour, remove the bone and the fat cap and shred with two forks.  Cover with the sauce and reheat when you are ready for dinner.  Tonight we are having some of the leftover pork on a baked potato.

I was just hungry for slaw.  It has never been one of my favorites, but I thought that it would be tasty with the pulled pork.  I just cheated and bought a bag of ready made slaw and a jar of Marzetti slaw dressing.  I thought it was kind of blah tasting, so I added a little sugar and a splash of apple cider vinegar.  The pork sandwich and the slaw were good together.  Of course there was dessert....

Since I was in a cooking mood, I made this recipe for Magic Lemon Meringue Pie from this link:
http://www.foodnetwork.com/recipes/trisha-yearwood/magic-lemon-meringue-pie-recipe/index.html

It was good, but probably not something I will make again because it uses a can of Eagle Brand Milk which made the pie really sweet.  So instead of putting this recipe under my Recipe tab, I put my favorite Weight Watcher Pie recipe there that is really easy to make and is a great summer dessert.

Here is a photo of the pie.  The recipe says it's easy because you put the crust, filling and meringue all in/on and then bake it.  The prep still took awhile.


I might try this method another time and use a different filling.


And so you don't think that this has turned into a cooking blog, here are a few more of the hexagons that I've been gluing.  I like the red and blue fabrics, but I feel like that pile needs something to spice it up a bit.  Any suggestions?


Hope you are finding some time to stitch.

Thanks for stopping by for a visit!  

Tuesday, July 9, 2013

English Paper Piecing Addiction Group

Yesterday morning I decided to join the English Paper Piecing Addiction Group at Back Door Quilts.  I was so excited about learning to glue hexagons at the shop last week that I wanted to go and see what others were accomplishing using this method.  We were there yesterday for about 2 hours, and I glued most of these hexagons in about an hour.


For some reason, after seeing the quilts at show and tell yesterday I think maybe my colors look a bit drab, so I'm going to add some brighter pinks and a little green to see how it looks.


Here is some of the show and tell.  My friend, MaryAnn is making this for a doll bed.  These hexagons are 1/4".


I think this is a Sue Daley pattern for the most part.  I just love that border.


This was made from one of the Sue Daley Playing With Paper packs.


The lady that showed this quilt was on the way to another quilt group, so she showed this stack and whack she made from a fabric in an ugly fabric contest.  


The girls from The Back Door made these quilts.


Our challenge for next month is to make one of these bowls and embellish it.  They have provided the paper pieces, and we come up with the ideas.  This is one already finished.


I'm not sure if this is Edyta's quilt left here from her trunk show and lecture last month or if the staff at the shop made this.  It is from a pattern by Edyta Sitar....www.laundrybasketquilts.com.  


Here is a better look at the nine patch from one of the earlier photos.


The shop made this sample for July 4th.  I love the center panel.  
 
I got several comments and emails from my last post about gluing hexagons.  One of the things asked was if there was an odor to the glue stick.  No.  There is no odor to either the Sewline glue refills or the Fons and Porter refills.  And, both refills fit in both pens.  The only thing I don't know right now since I've just started this method is whether or not the glue will hold indefinitely.  Time will tell, but for right now I'm sold.

Thanks for stopping by!

Hope you are finding some time to stitch.....or glue today!

Friday, July 5, 2013

Hexagons: Thread or Glue Basting?

I love hexagons and hexagon quilts.  I have several different sizes of hexagon paper pieces and have made a few flowers for different projects that are in the works.


I have always basted my hexagons with needle and thread.  I don't sew through the papers; I just fold over the corners and tack them.
 

I thought I had come up with a faster method when I bought these little Clover clips. 


The paper always seemed to slip out of my first corner until I started using one of these clips to hold down the first corner while I worked my way around the hexagon with needle and thread.


Then the other day I was in Back Door Quilts.  I asked one of the girls there what type of needle she used to baste her hexagons around the papers.  And, then she showed me this:  She glue bastes them on with the Sewline glue pen.  I was amazed because I had never seen anyone do this before.


 This is really so much faster than thread basting.  As you add more hexagons and work your way out from the center hexagon, you just remove the center most paper.  Then the paper can be used over several more times.  I can see where this could take a lot of glue if you are working on a large project.  A friend told me that I could buy refills for my Sewline glue pen at JoAnns.  With a coupon they are really affordable. 


If you are just making a hexagon or hexagon flower to applique' onto a background fabric, you can always use a Needle Gripper to reach underneath and remove the paper.  The Needle Gripper can also be purchased at JoAnns.  (Don't forget your coupons!)  I also don't see why you couldn't press the edges of the hexagons, remove the papers, and then applique' them.


To fussy cut instead of buying a plastic template, I made my own template out of index cards.  I traced one of the hexagon papers onto the index card and then measured out 3/8" on each side, connected the lines and cut.  I know most people recommend a 1/4" to turn under, but I like to have a little extra so that I can center my motif.  I made two because I knew if I only had one, I would never be able to find it!


This way I have a window so that I can see what the hexagon will look like after it is basted.


I've done a few of these, and I think the glue basting is going to make hexagons a lot faster to sew.


If anyone else out there has glue basted instead of stitching, I'd love to hear from you.


When I take a lot of my blog photos, a lot of times I spread a piece of white flannel over one of my chairs and place it by the window so that the light reflects off of the flannel to make the photos brighter.  This is my helper, Tiki.  I guess he thought that I was making a little bed for his afternoon nap.


I hope you are finding some time to stitch today. 

Thanks for stopping by for a visit!  

Print This Post

Related Posts Plugin for WordPress, Blogger...